
Create Lambda Layer on Different Architecture
If you have tried to use an AWS Lambda function to run your Python code, you might have bumped into problems when starting your Lambda for the first time. Issues may stem from the Lambda layer. The layer – built on your PC – will not work with the Lambda if your computer and your Lambda’s architecture are different. Lambdas are mostly used with x86-based processors to serve all types of dependencies. However, it is possible that your computer does not use that same processor type. If you work from an Apple computer – like in my case –, your PC might have ARM64 architecture, so you are not able to create a layer for your x86_64 Lambda function. In this case, you have two options: let your CI/CD tool (e.g. AWS CodeBuild) build the layer, or build it through a virtual machine (VM). In this post, I will go through the second option, but I will also explore the first option in another post.
Options
Before diving into the actual process, let’s compare the two options. If the layer needs to be built regularly, I would definitely go with the CI/CD option because the pipeline only needs to be set up manually once, after that, it does the work automatically. If a new layer is only needed once in a while, and you do not use a CI/CD tool for any other purpose in your project, then using a VM might be the better solution (but it takes a bit longer).
TLDR
First, I will install UTM and emulate a Debian 11 OS. After that, I will make an ssh connection to the VM, install python, and copy the requirements file to the VM. The requirements are going to be made into a zip from which the layer can be built. I will copy the zip to my local machine and build the layer with it using the aws cli.
Set Up the VM
If you do not know it, yet, check your PC’s architecture:
uname -a
The first step is to download a virtualization tool and emulate an x86-based OS. I have a MacBook with MacOS Monterey, so UTM is going to be the perfect tool for me. It is available in the App Store for free, and it is very easy to use. My emulated OS is going to be Debian 11 AMD64. Note that amd64 is the same as x86_64.
- Download and install UTM
- Download
debian-11.5.0-amd64-netinst.isofrom here - Open UTM
- Select Create a new virtual machine > Emulate > Linux
- In the Boot iso image section, upload the
.isofile - Click Continue until the end
- Start the VM
- Select Graphical Install
- Set the root password and the first user
- Go through the rest of the installation with default settings
- After the installation, close the window
- Select the VM on the left pane in UTM and clear CD/DVD on the right pane
- Start the VM
Set Up the SSH Connection
You can do the necessary tasks on the VM via the graphical interface (as Debian has GUI) or the command line. I will do it on the command line with ssh. I will briefly go through the steps of setting up the ssh connection. Make sure your user on the VM is an admin, if not, add it to the sudoers.
- Install ssh on the VM
sudo apt update
sudo apt install openssh-server
- Install ssh on your local machine (LM)
brew install openssh
- Create the ssh key on the LM
ssh-keygen -t ed25519
When it asks for in which file to save the key, select default by just hitting ‘Enter’. Then, it asks for a passphrase, which is optional. This generated a private-public key pair on your machine.
- Get the IPv4 address on the VM
ip a
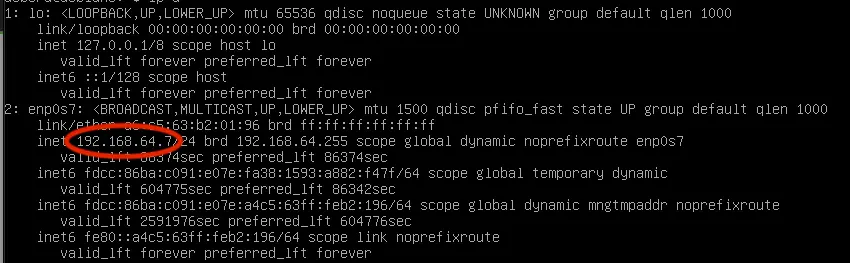
This is the internal address of the VM, which we need to use for the ssh connection.
- Go to your LM and copy only! the public key to the VM
ssh-copy-id -i ~/.ssh/id_ed25519.pub <user>@<ip_address_of_the_vm>
- From the LM, connect to the VM and login
ssh <user>@<ip_address_of_the_vm>
Build the Layer
- Install Python on the VM (using the ssh connection)
sudo apt install python3
sudo apt install python3-pip
sudo apt install python3-venv
sudo apt install zip
- Exit the ssh session
exit
- Copy the requirements.txt from your LM to the VM in home folder of the user
cd <the_path_where_the_requirements_are_located>
scp requirements.txt <user@><ip_of_the_vm>:.
- Connect with ssh again
ssh <user>@<ip_address_of_the_vm>
- Create a virtual environment on the VM in the home folder (where requirements.txt is)
python3 -m venv venv
. venv/bin/activate
- Install the requirements and zip them
pip install -r requirements.txt -t python/
zip -r <layer_name>.zip python/
- Copy the
.zipfile from the VM to your LM
scp <user>@<ip_of_local_machine>:./<zip_file> <path_on_the_local_machine>
Publish the Layer
- Exit the ssh session
exit
- Publish the Lambda layer on your LM (assuming that you already have aws cli tools set up on your PC):
. ~/venv/bin/activate
export AWS_PROFILE=<name_of_your_aws_profile>
aws lambda publish-layer-version \
    --layer-name <layer_name> \
    --description "<description>" \
    --license-info "<license>" \
    --zip-file  "fileb://<layer_name>.zip"  \
    --compatible-runtimes python3.9 \
    --compatible-architectures "x86_64"